ตั้งค่า FortiGate เบื้องต้น
ในบทนี้เราจะแนะนำการตั้งค่า FortiGate ให้เครื่องคอมพิวเตอร์ภายใน Internal network สามารถออก Internet ได้ เป็นพื้นฐานที่จำเป็นสำหรับการเริ่มต้นใช้งาน FortiGate ทุกตัว
Scope
- อุปกรณ์ทดสอบ: FortiGate 60F firmware v7.6.6
- โหมดการทำงาน: NAT mode (default)
- Configuration อื่น ๆ: ใช้ค่า default ทั้งหมด
Topology
┌──────────┐      ┌──────────┐         ┌─────────────────┐         ┌──────────────────┐
│ Internet │ ───→ │  Router  │ ──────→ │    FortiGate    │ ──────→ │ Internal Network │
└──────────┘      └─────┬────┘         └──┬───────────┬──┘         └────────┬─────────┘
                        │                 │           │                     │
                    LAN port            wan1       internal              Clients
                  192.168.0.2/24   192.168.0.1/24 192.168.1.99/24         (DHCP)
                        │                 │           │                     │
                        └─── WAN link ────┘           └──── LAN link ───────┘
                            192.168.0.0/24                192.168.1.0/24
| Segment | Subnet | อุปกรณ์ในเซกเมนต์ |
|---|---|---|
| WAN-side link | 192.168.0.0/24 |
Router LAN port (.0.2) ↔ FortiGate wan1 (.0.1) |
| LAN-side link | 192.168.1.0/24 |
FortiGate internal (.1.99) ↔ Clients (DHCP .1.100-.1.200) |
หมายเหตุ: บน FortiGate 60F และรุ่นที่มี VLAN Switch เป็น default — interface ที่ชื่อ
internalจะรวม physical portinternal1ถึงinternal5ไว้เป็น 1 ก้อน เราจะตั้งค่าที่internalทีเดียวพอ ไม่ต้องตั้งinternal1internal2แยกกัน
ภาพรวมขั้นตอน
หลังจากที่ติดตั้งอุปกรณ์เข้ากับ network ตาม topology แล้ว สิ่งที่ต้องทำมี 3 ขั้น:
- ตั้งค่า Interface — กำหนด IP ให้ขา WAN และขา LAN
- ตั้งค่า Routing — บอก FortiGate ว่า traffic ขาออกไปทางไหน
- ตั้งค่า Firewall Policy — อนุญาตให้ traffic จาก LAN ออก WAN ได้
Step 1: ตั้งค่า Interface
ไปที่ Network → Interfaces
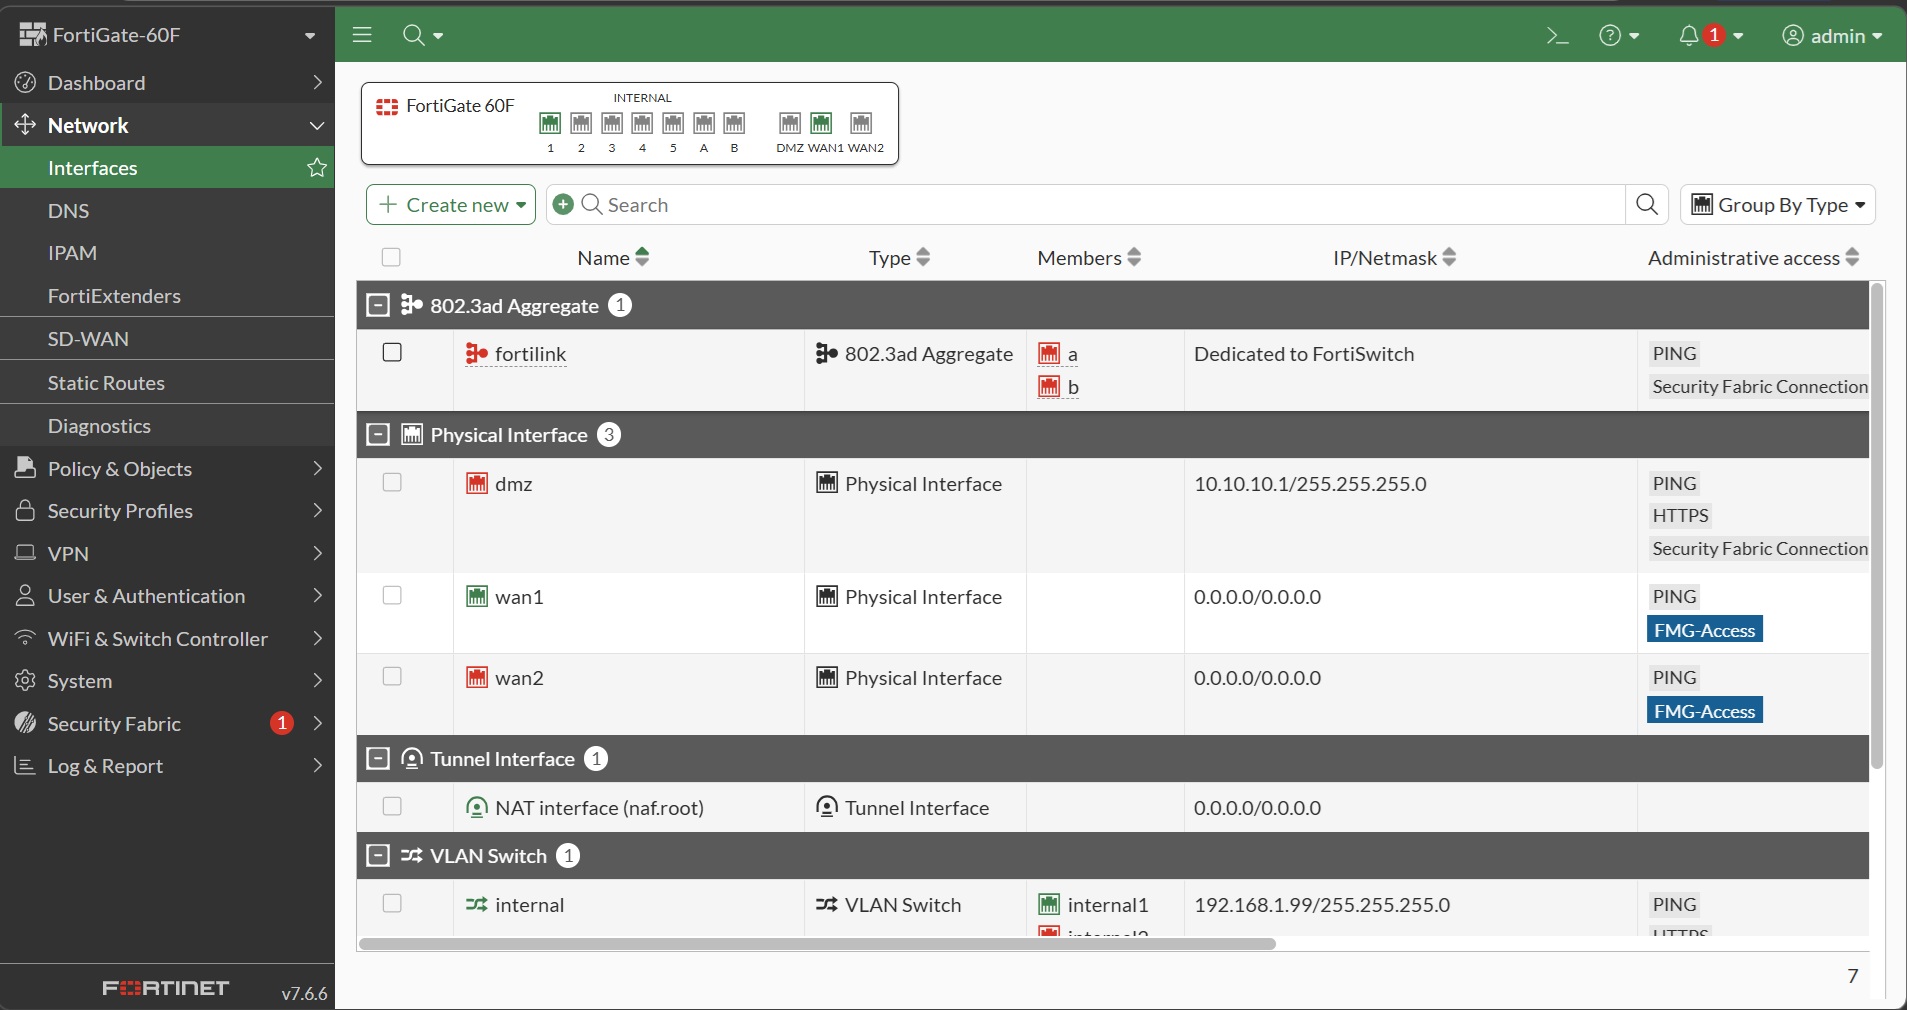 รูป 1: หน้ารวม Interfaces — เห็น
 wan1 (Physical), internal (VLAN Switch รวม internal1-5)
1.1 ตั้งค่า WAN1 (เชื่อมไป Router)
ดับเบิลคลิกที่ wan1 แล้วตั้งค่า:
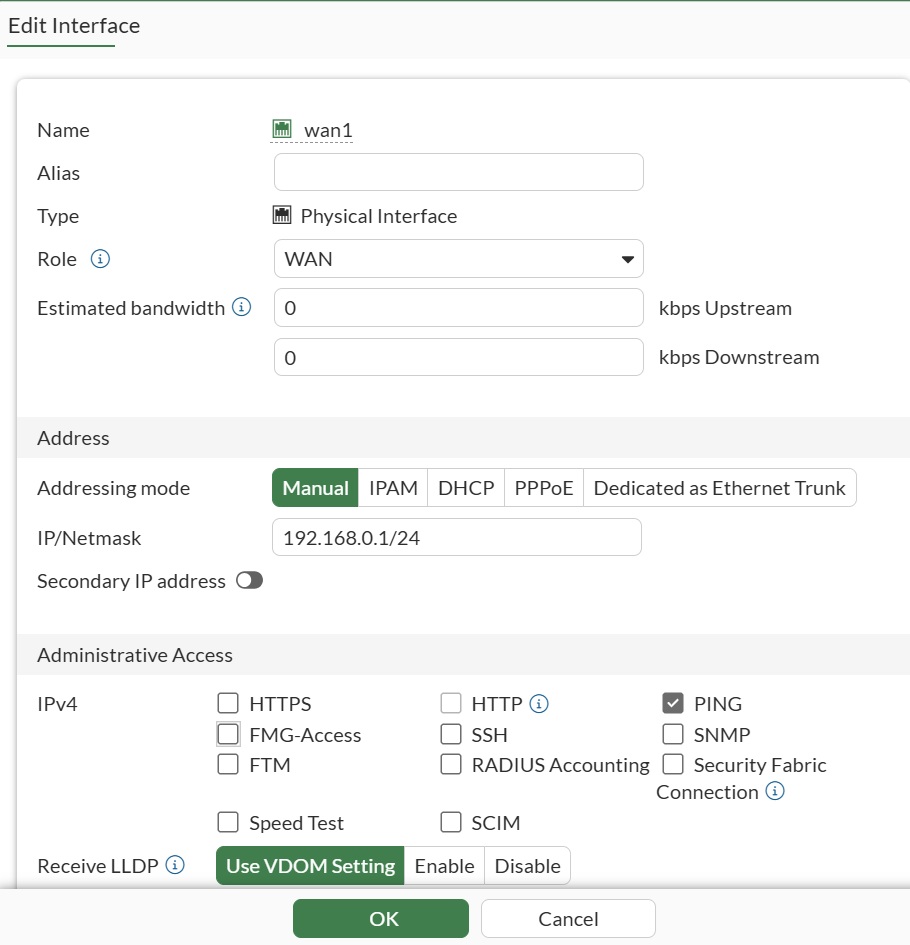 รูป 2: Edit Interface wan1
| Field | ค่า |
|---|---|
| Addressing mode | Manual |
| IP / Netmask | 192.168.0.1/24 |
| Administrative Access | PING เท่านั้น (ไม่เปิด HTTPS/SSH ที่ฝั่ง WAN) |
| Role | WAN |
เหตุผลที่ไม่เปิด HTTPS บน wan1: เพื่อความปลอดภัย — หากต้อง remote เข้าจาก Internet ใช้ VPN เข้ามาแทน
📋 CLI equivalent (คลิกเพื่อขยาย)
config system interface
    edit "wan1"
        set mode static
        set ip 192.168.0.1 255.255.255.0
        set allowaccess ping
        set role wan
    next
end
1.2 ตั้งค่า Internal (เชื่อมไป Client)
ดับเบิลคลิกที่ internal แล้วตั้งค่า:
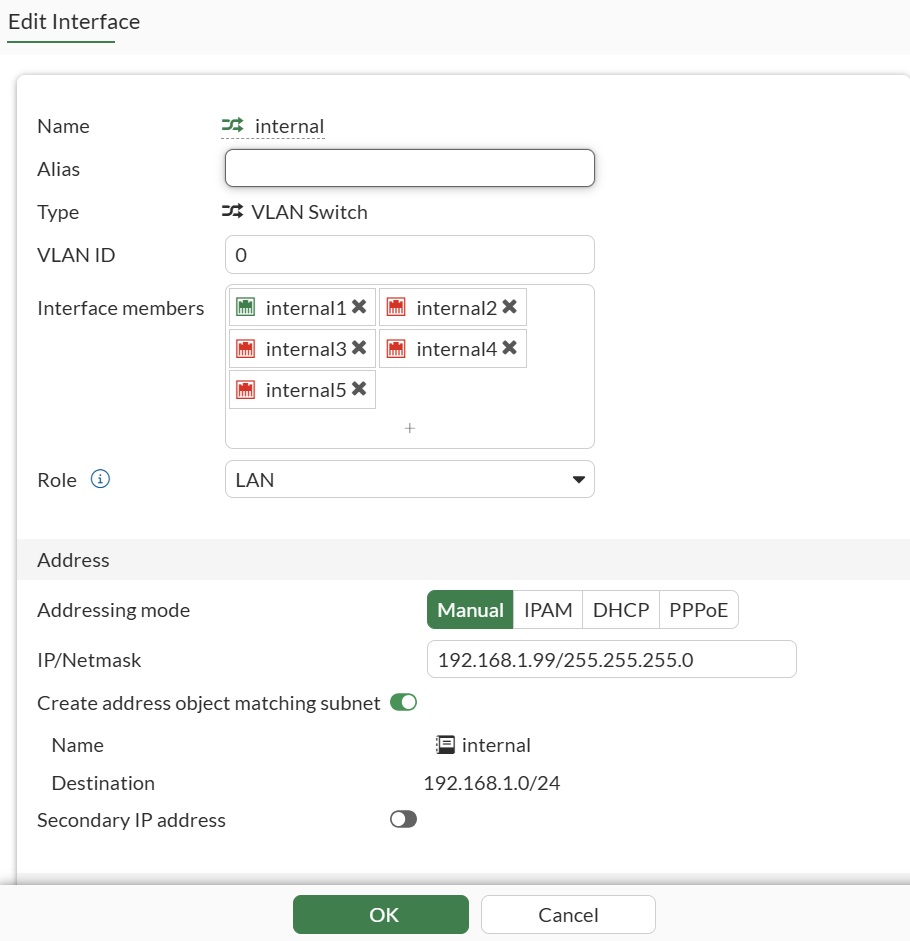 รูป 3: Edit Interface internal
| Field | ค่า |
|---|---|
| Type | VLAN Switch (default — มี internal1-internal5 เป็น member) |
| Role | LAN |
| Addressing mode | Manual |
| IP / Netmask | 192.168.1.99/24 |
เกี่ยวกับ IP
192.168.1.99: ค่านี้เป็น default ของ FortiGate (มาจากโรงงาน) — ใน Lab นี้เราใช้ค่า default ตามที่มี ถ้าต้องการเปลี่ยนเป็น IP อื่น (เช่น192.168.1.1) สามารถแก้ที่ช่อง IP/Netmask ในหน้าเดียวกันนี้ได้เลย แล้วอย่าลืมแก้ Default Gateway ของ DHCP (ขั้น 1.3) ให้ตรงกัน
📋 CLI equivalent (คลิกเพื่อขยาย)
config system interface
    edit "internal"
        set ip 192.168.1.99 255.255.255.0
        set allowaccess ping https
        set role lan
    next
end
1.3 (ทางเลือก) แจก DHCP ให้ Client
หน้าเดียวกับ 1.2 — เลื่อนลงล่างจะเห็น section Administrative Access + DHCP Server เปิด toggle และตั้งค่า:
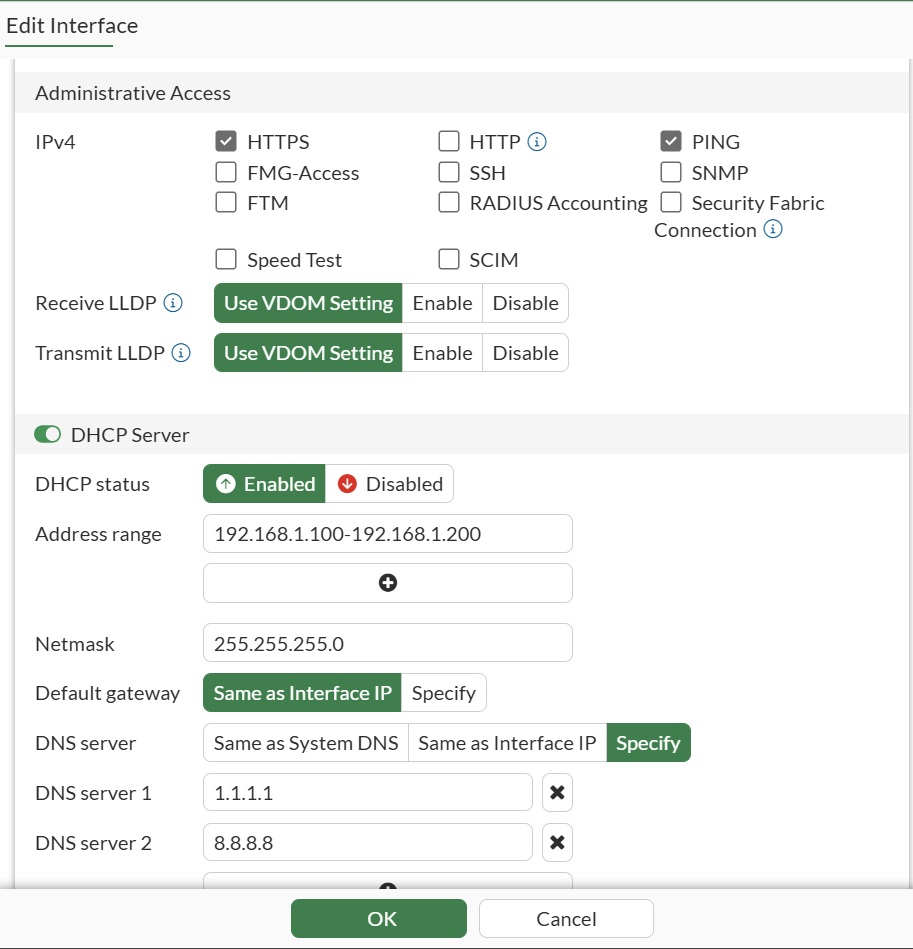 รูป 4: Administrative Access (PING + HTTPS) และ DHCP Server
| Field | ค่า |
|---|---|
| Administrative Access | PING, HTTPS |
| DHCP status | Enabled |
| Address range | 192.168.1.100 - 192.168.1.200 |
| Netmask | 255.255.255.0 |
| Default gateway | Same as Interface IP (= 192.168.1.99) |
| DNS server | Specify → 1.1.1.1, 8.8.8.8 |
📋 CLI equivalent (คลิกเพื่อขยาย)
config system dhcp server
    edit 1
        set default-gateway 192.168.1.99
        set netmask 255.255.255.0
        set interface "internal"
        config ip-range
            edit 1
                set start-ip 192.168.1.100
                set end-ip 192.168.1.200
            next
        end
        set dns-service specify
        set dns-server1 1.1.1.1
        set dns-server2 8.8.8.8
    next
end
Step 2: ตั้งค่า Static Routing
ไปที่ Network → Static Routes แล้วคลิก Create New
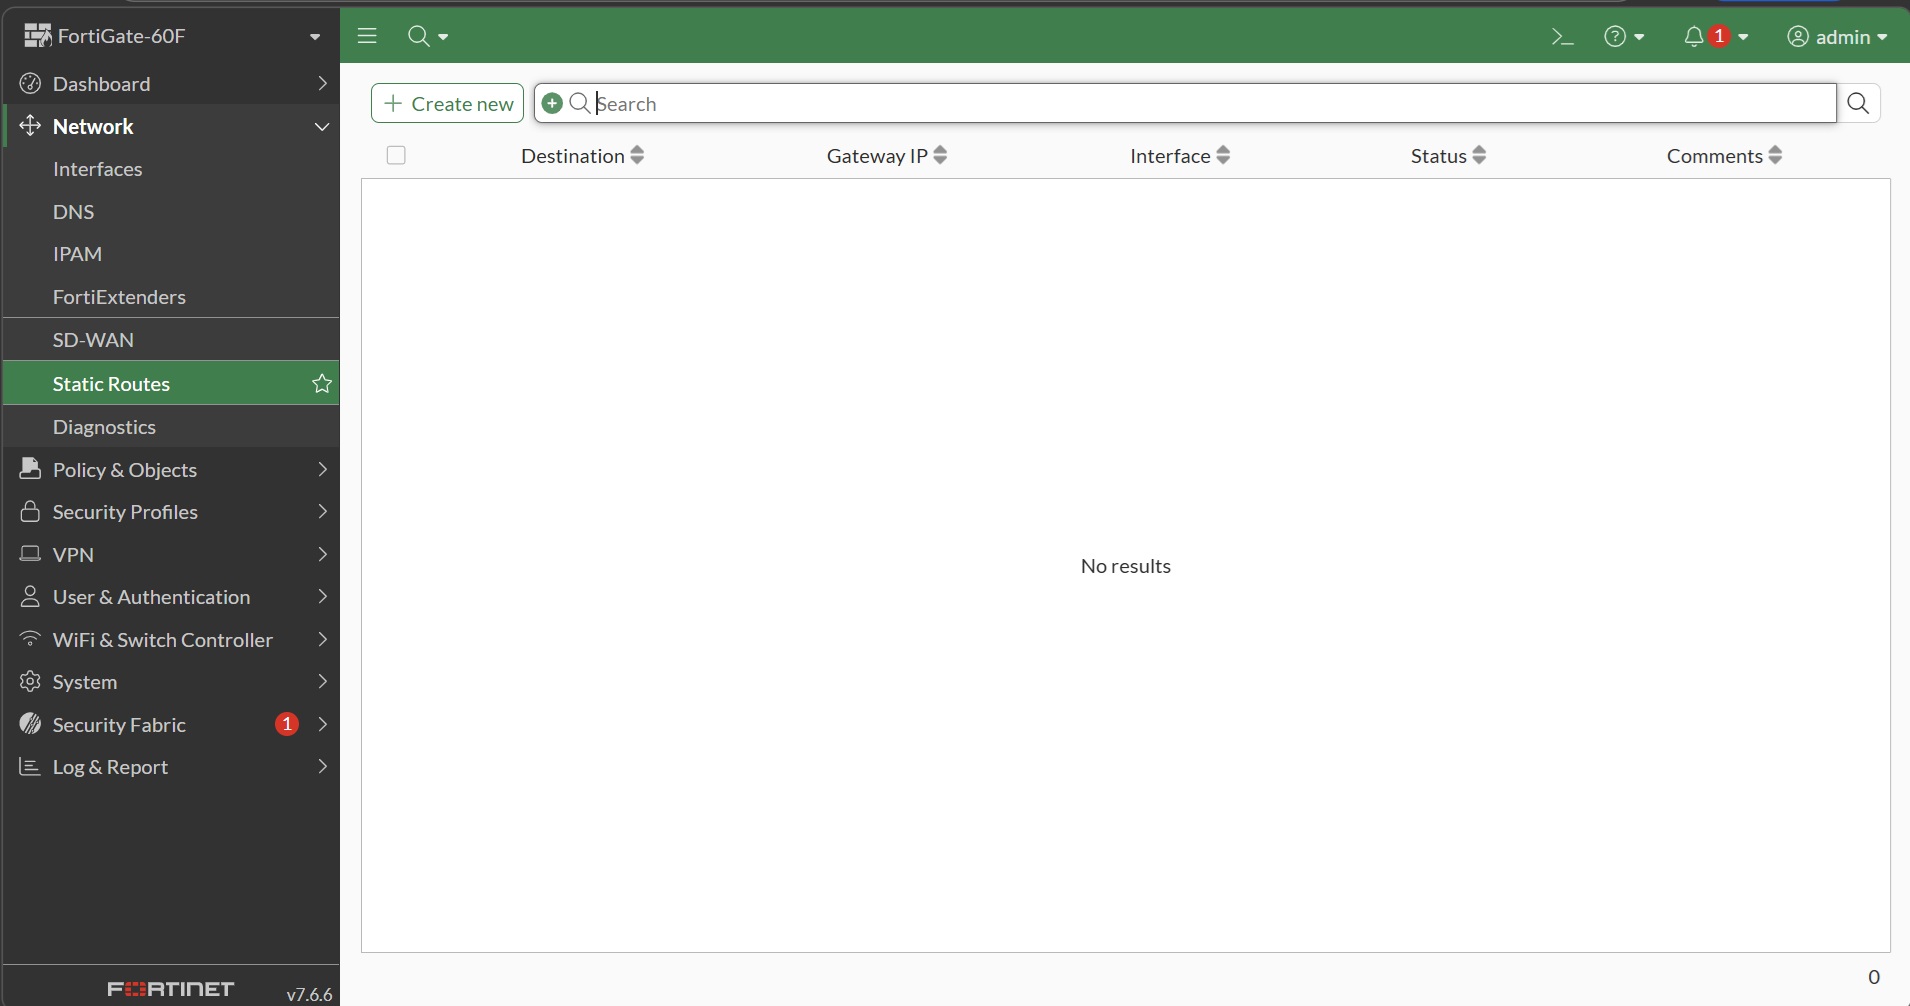 รูป 5: หน้า Static Routes ก่อนสร้าง
ใส่ข้อมูล default route:
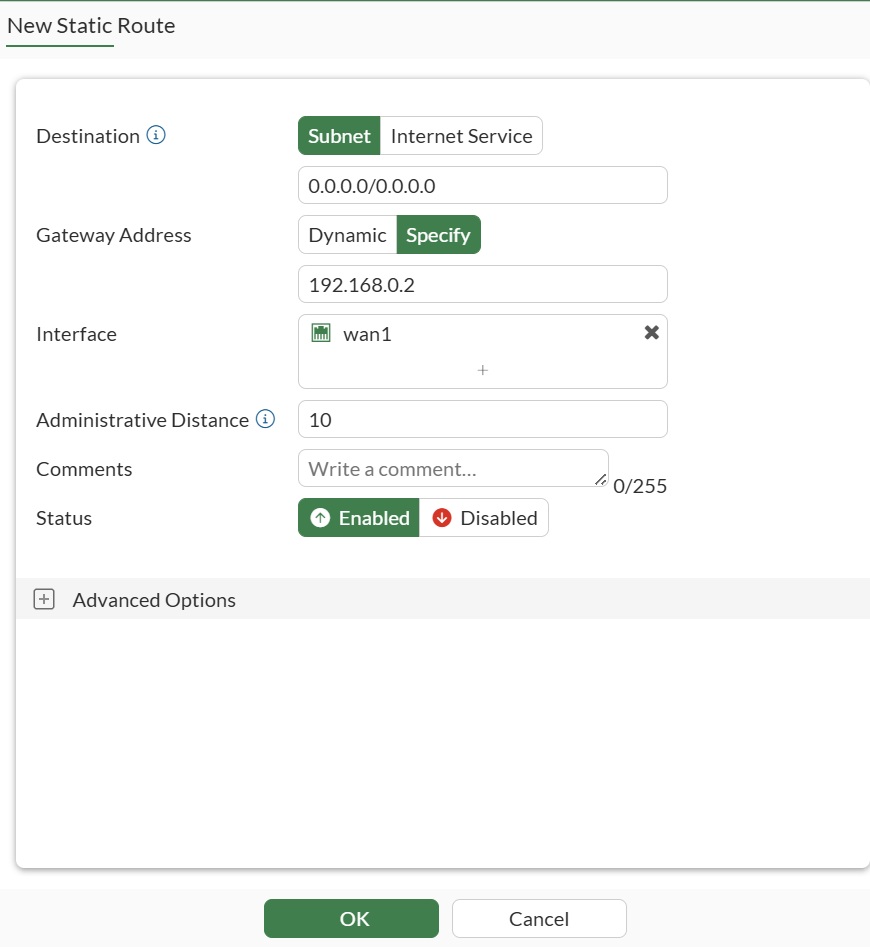 รูป 6: New Static Route — default route ผ่าน wan1 ไปยัง Router
| Field | ค่า |
|---|---|
| Destination | Subnet 0.0.0.0/0.0.0.0 |
| Gateway Address | Specify → 192.168.0.2 |
| Interface | wan1 |
| Administrative Distance | 10 (default) |
| Status | Enabled |
อธิบาย: การกำหนด destination เป็น
0.0.0.0/0หมายถึง Default Route — ถ้าไม่มี route ไหน match ที่เฉพาะเจาะจงกว่านี้ ทุก traffic จะใช้ rule นี้ (ส่งไปให้ Router ที่192.168.0.2)
📋 CLI equivalent (คลิกเพื่อขยาย)
config router static
    edit 0
        set dst 0.0.0.0 0.0.0.0
        set gateway 192.168.0.2
        set device "wan1"
    next
end
Step 3: ตั้งค่า Firewall Policy
ไปที่ Policy & Objects → Firewall Policy
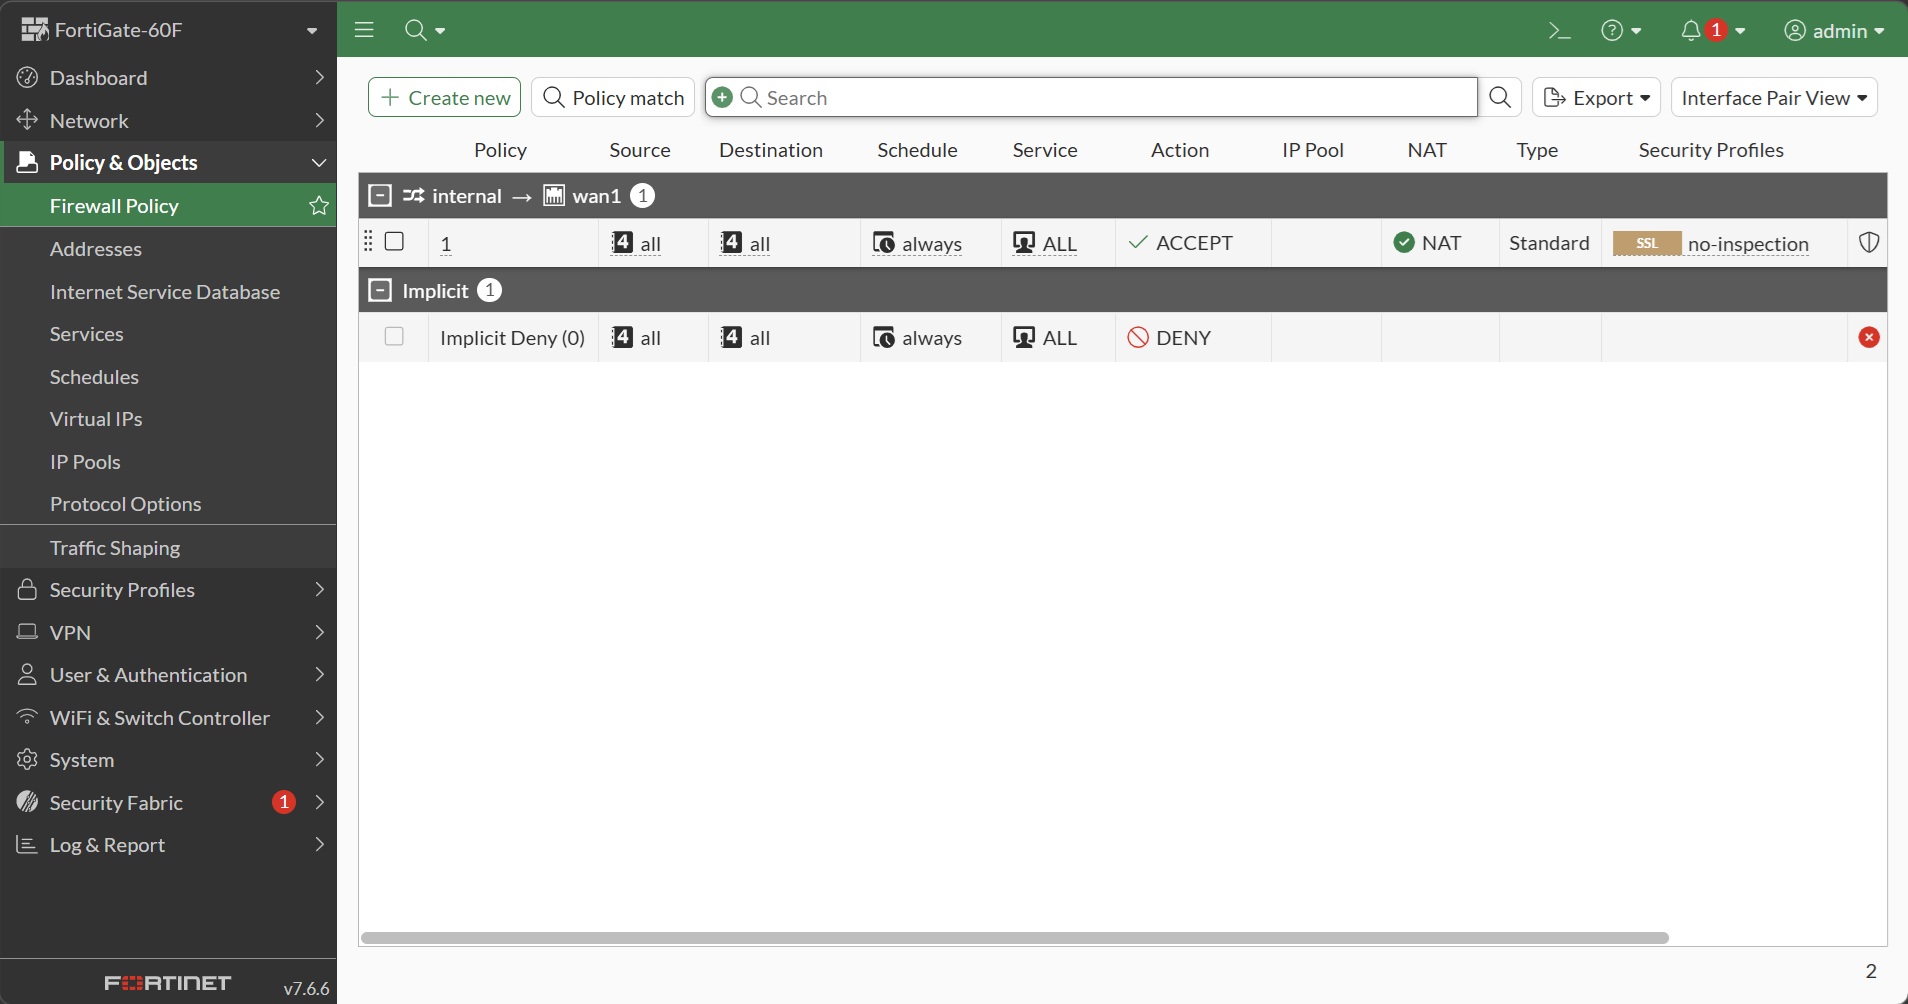 รูป 7: หน้า Firewall Policy บน firmware 7.6.6 — มี default policy
 internal → wan1 อยู่แล้ว
หมายเหตุสำหรับ firmware 7.6.6: จะเห็นว่ามี default policy
internal → wan1(Sourceall→ Destinationall, ActionACCEPT, NATenabled) สร้างไว้ให้แล้ว ตามทฤษฎีแค่นี้ client ก็ออก Internet ได้แต่ในบทเรียนนี้เราจะ สาธิตการสร้าง policy ใหม่ด้วยตัวเอง เพื่อให้เข้าใจ field ทุกตัว
คลิก Create new เพื่อสร้าง policy ใหม่:
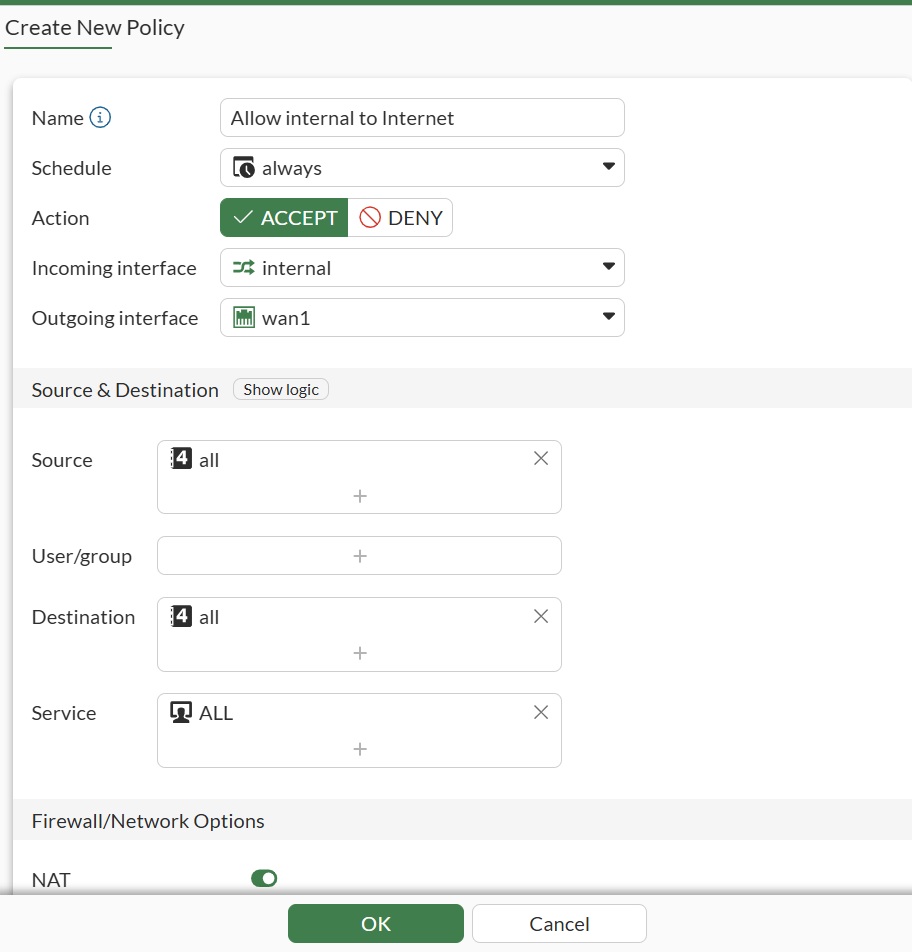 รูป 8: Create New Policy — ส่วนข้อมูลพื้นฐาน
| Field | ค่า |
|---|---|
| Name | Allow internal to Internet |
| Schedule | always |
| Action | ACCEPT |
| Incoming interface | internal |
| Outgoing interface | wan1 |
| Source | all |
| Destination | all |
| Service | ALL |
เลื่อนลง — ตั้งค่า NAT, Security Profiles และ Logging:
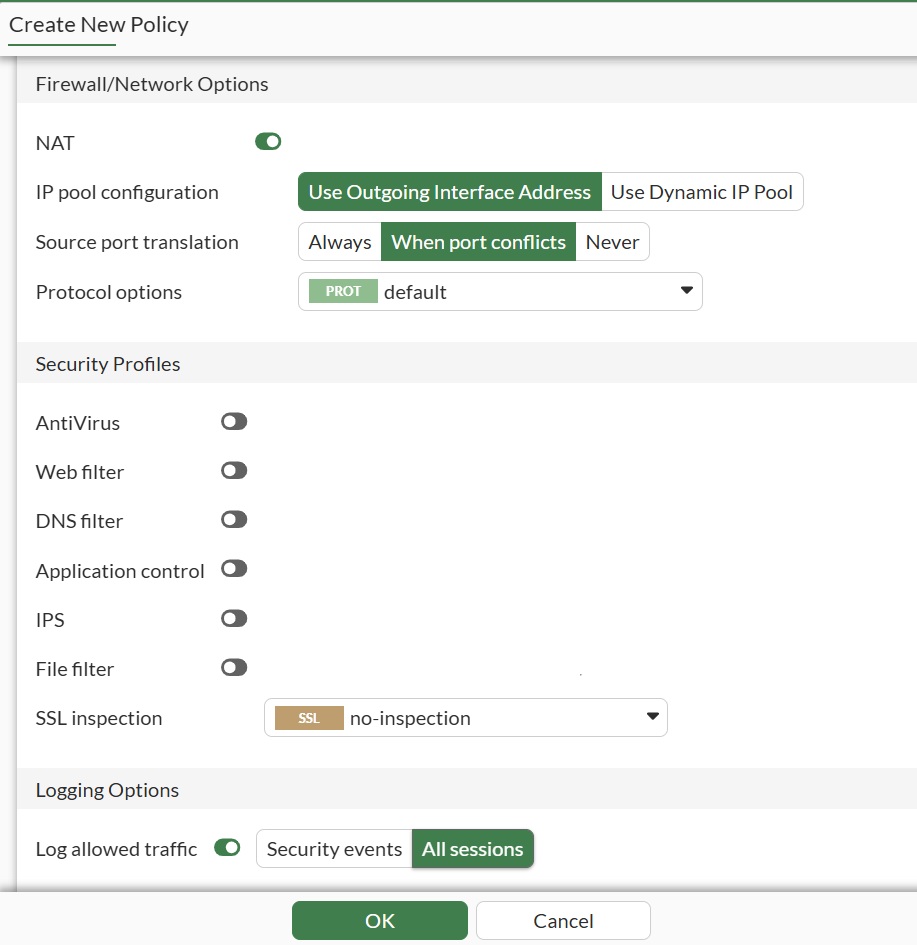 รูป 9: Create New Policy — Firewall/Network Options และ Logging
| Field | ค่า |
|---|---|
| NAT | Enabled |
| IP pool configuration | Use Outgoing Interface Address |
| Security Profiles | ปิดทั้งหมด (เน้นทดสอบ connectivity ก่อน) |
| SSL inspection | no-inspection |
| Log Allowed Traffic | All Sessions |
📋 CLI equivalent (คลิกเพื่อขยาย)
config firewall policy
    edit 0
        set name "Allow internal to Internet"
        set srcintf "internal"
        set dstintf "wan1"
        set srcaddr "all"
        set dstaddr "all"
        set service "ALL"
        set action accept
        set schedule "always"
        set nat enable
        set logtraffic all
    next
end
ตรวจสอบผลลัพธ์
หลังตั้งค่าครบทั้ง 3 ขั้น ทดสอบจากเครื่อง client ใน internal network:
# ทดสอบจาก client
ping 192.168.1.99          # ทดสอบถึง FortiGate
ping 192.168.0.2           # ทดสอบถึง Router
ping 8.8.8.8               # ทดสอบออก Internet
nslookup www.google.com    # ทดสอบ DNS
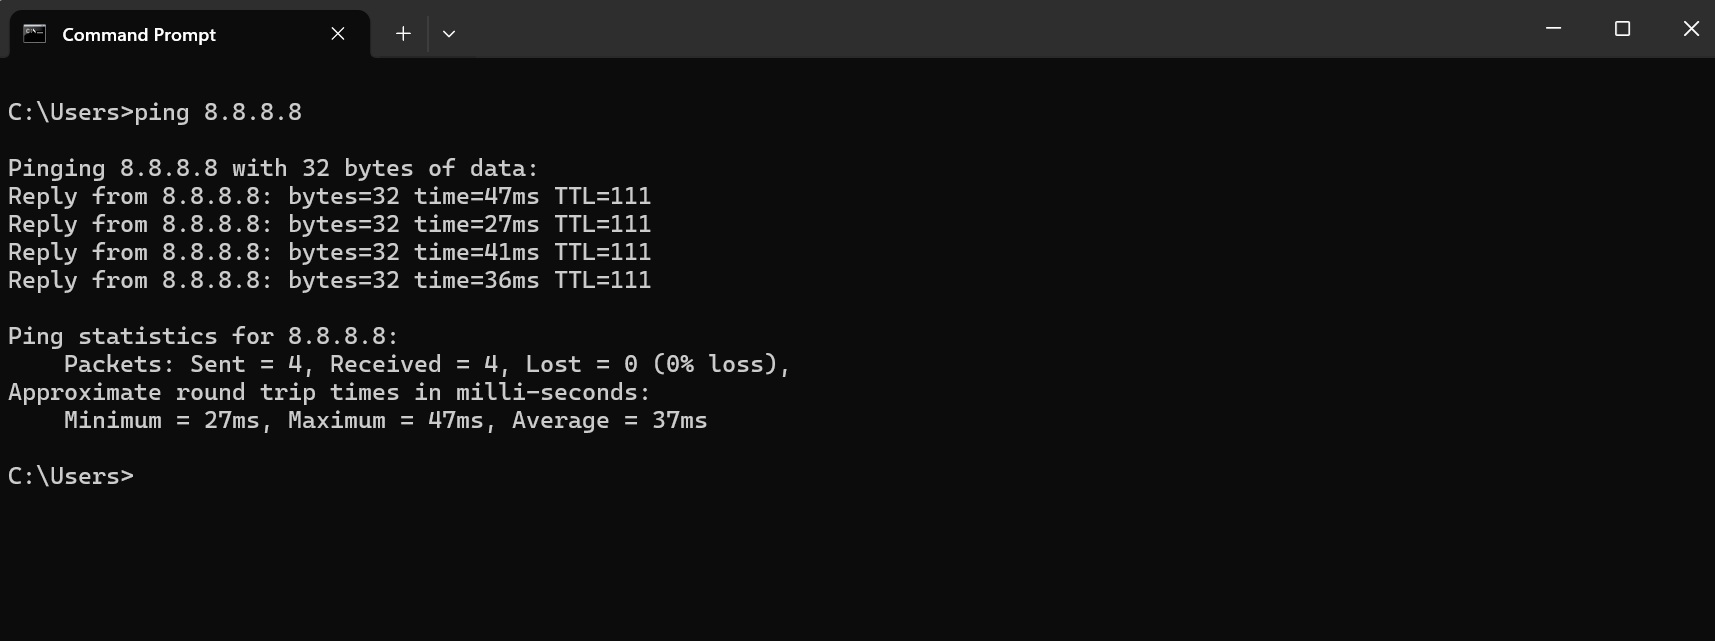 รูป 10: ทดสอบจาก client PC — Internet ใช้งานได้
ทดสอบจาก FortiGate เอง — เปิด CLI Console (ไอคอน >_ ที่ topbar):
# ตรวจสอบจาก FortiGate CLI
execute ping 8.8.8.8        # ทดสอบออก Internet

# ดู routing table
get router info routing-table all
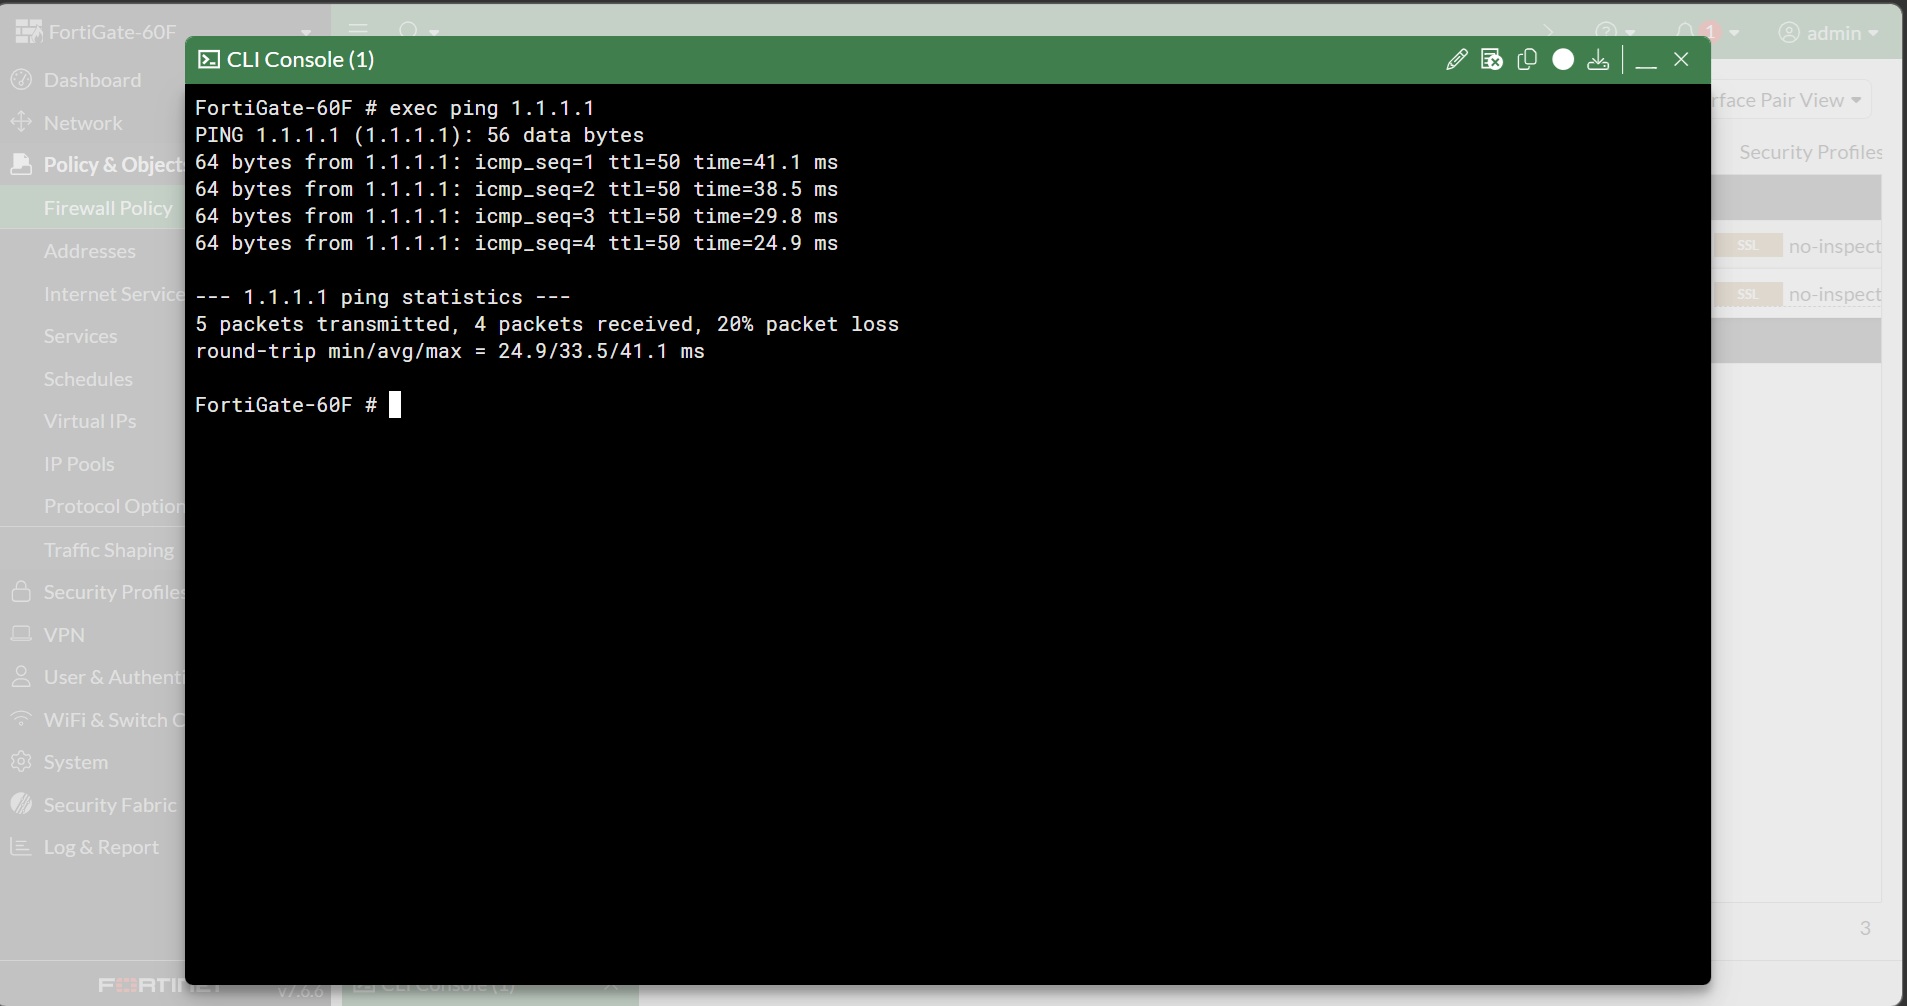 รูป 11: ทดสอบ ping จาก FortiGate ไปยัง Internet
ดู client ที่ได้รับ DHCP — กลับไป Network → Interfaces column DHCP clients ของ internal:
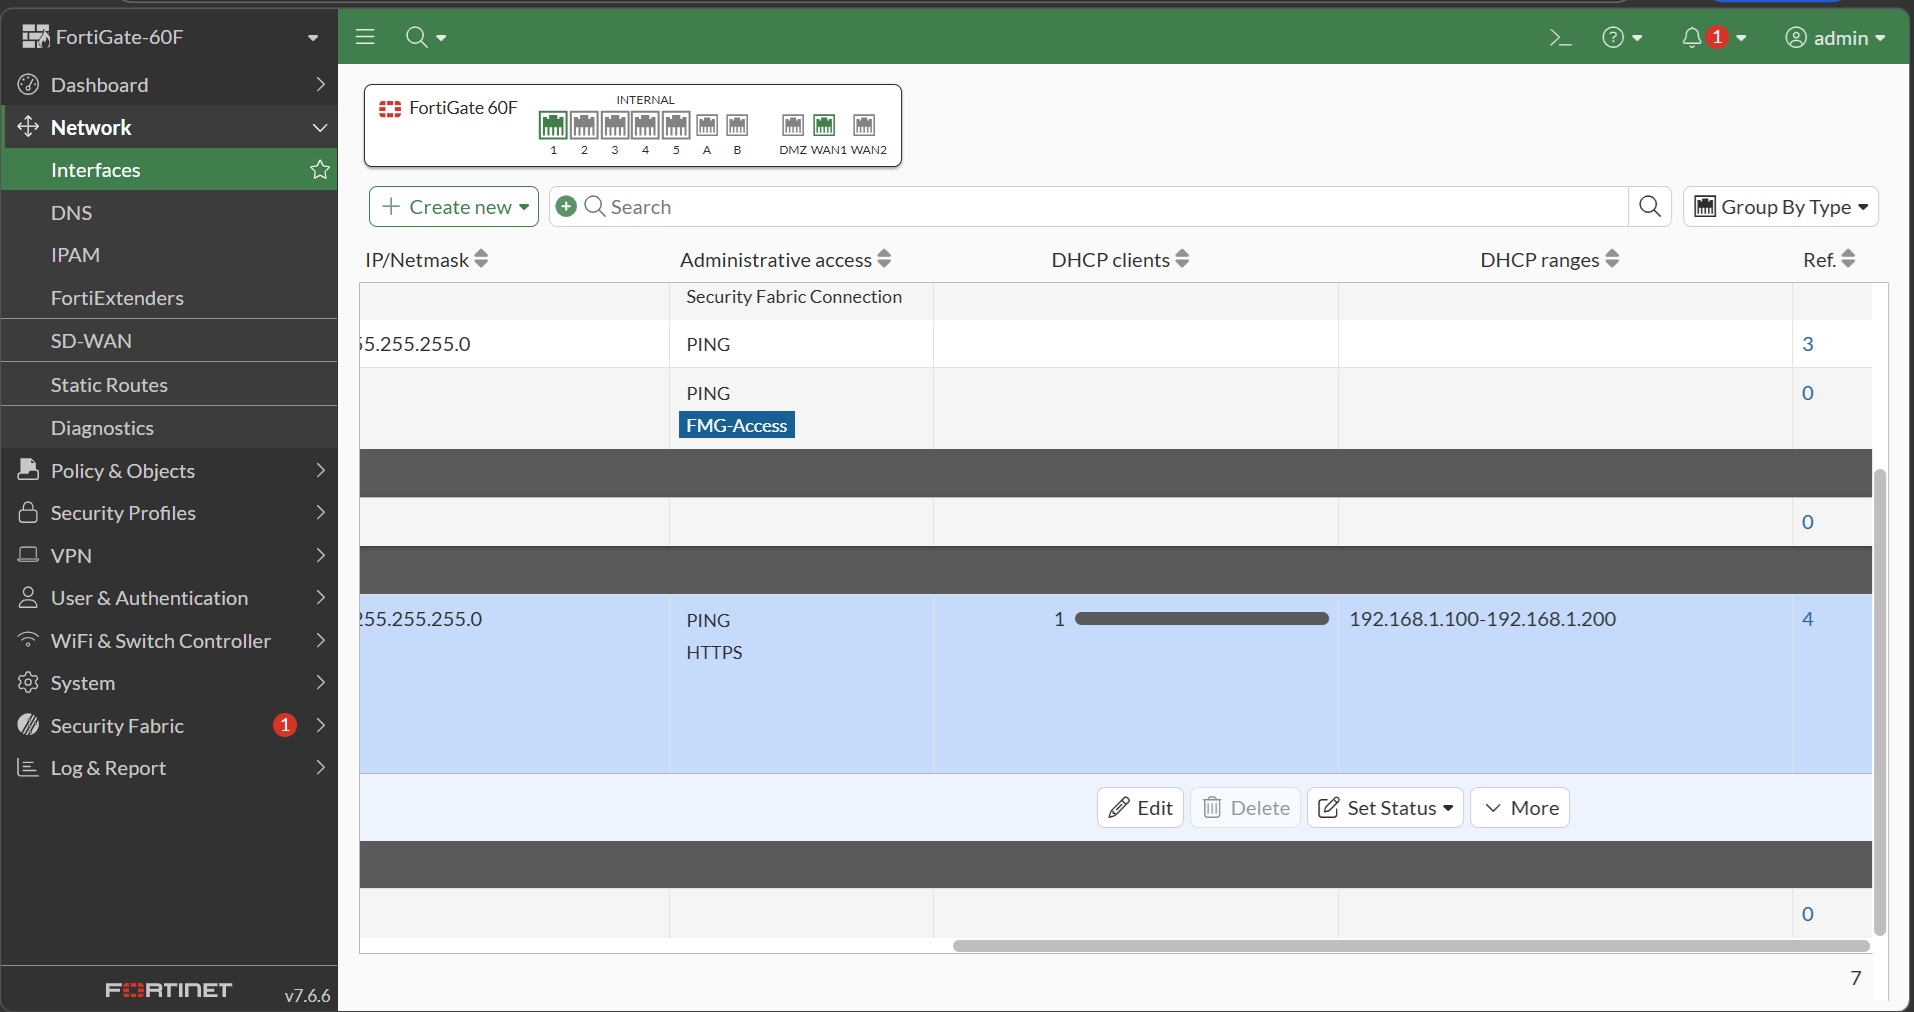 รูป 12: client ได้รับ IP จาก DHCP server
ปัญหาที่พบบ่อย
| อาการ | สาเหตุที่เป็นไปได้ |
|---|---|
Client ping FortiGate (192.168.1.99) ไม่เจอ |
ลืมเปิด allowaccess ping บน internal |
| Client ไม่ได้ IP จาก DHCP | DHCP Server ปิดอยู่ หรือ subnet ผิด |
| Ping ภายในได้ แต่ออก Internet ไม่ได้ | ลืมสร้าง static route หรือ gateway ผิด |
| ออก Internet ได้แต่เปิดเว็บไม่ได้ | DNS ไม่ทำงาน |
Best Practices
- อย่าเปิด
allowaccessHTTPS/SSH บน WAN interface ใน production — ใช้ VPN เข้าแทน - ตั้งชื่อ policy ให้สื่อความหมาย —
Allow internal to Internetดีกว่าpolicy 1